Saturday, September 15, 2012
Self-Frosting Nutella Cupcakes
I used to hate Nutella. It's a sad, sad fact, but it's true. While we were in France, I had a bite of a particularly delicious crepe smothered in Nutella. Every hotel we stayed at served little cups of Nutella with baguettes and croissants. I became obsessed. Now it goes on everything: waffles, bread, fruit, and now cupcakes. These were very good, but the cupcake itself was just a little dry, so I will probably use all butter next time or make smaller muffins to shorten the cooking time. Smaller muffins would have helped the overflow problem I had as well. Lesson learned: don't overfill your muffin tin!
Self-Frosting Nutella Cupcakes
*From The Family Kitchen
1/4 cup unsalted butter, at room temperature
1/4 cup canola oil
1 cup sugar
2 eggs
1 tsp vanilla
1 3/4 cups all purpose flour
2 tsp baking powder
1/4 tsp salt
1/2 cup milk or half and half
1/2-2/3 cup Nutella
Preheat oven to 350º.
Beat the oil, butter, and sugar together until light and fluffy. Add the eggs and vanilla and beat until smooth.
In a small bowl, stir together the flour, baking powder, and salt. Add half of the mixture to the batter and beat on low speed until just combined. Add the milk and mix until just combined, then add the rest of the flour mixture and mix until just combined.
Divide the batter between 12 paper-lined muffin cups (I will do 15-18 muffins next time). Spoon the Nutella into a dish and microwave for 15-30 seconds, until soft. Drop a spoonful of Nutella into each muffin cup on top of the batter and swirl with a knife.
Bake 20-30 minutes or until springy to the touch. Enjoy!
Tuesday, August 21, 2012
Homemade Taco Seasoning
What do you do when you really want Mexican, but you're out of taco seasoning? You frantically search the internet (seriously, what did we do before the internet?) and find a recipe for homemade taco seasoning that sounds promising. Then you tweak it a little bit and hope for the best. The verdict? It was good! We missed a little bit of salt, which might be a residual effect of our reliance on the standard pre-packaged taco seasoning, but a pinch of salt in the finished product did the trick. This seasoning was spicy, smoky, and delicious! We will be sticking with homemade taco seasoning from now on.
Homemade Taco Seasoning
*Adapted from Annie's Eats
4 tbsp. chili powder
3 tbsp. plus 1 tsp. smoked paprika
3 tbsp. ground cumin
1 tbsp. plus 2 tsp. onion powder
1 heaping tsp. garlic powder
3/4 tsp. cayenne pepper
1/4 tsp. ground red pepper
Mix all ingredients together and store in an airtight container. To use: Add 2 heaping tablespoons seasoning, a pinch of kosher salt, and 1 cup of water to 1 pound cooked beef, chicken, or pork. Simmer until the liquid is completely gone. You can also use about 1 tablespoon per can of black beans as a side dish as well.
**We did find that a pinch of salt was necessary for flavor in our dish, so add salt to taste!
Homemade Taco Seasoning
*Adapted from Annie's Eats
4 tbsp. chili powder
3 tbsp. plus 1 tsp. smoked paprika
3 tbsp. ground cumin
1 tbsp. plus 2 tsp. onion powder
1 heaping tsp. garlic powder
3/4 tsp. cayenne pepper
1/4 tsp. ground red pepper
Mix all ingredients together and store in an airtight container. To use: Add 2 heaping tablespoons seasoning, a pinch of kosher salt, and 1 cup of water to 1 pound cooked beef, chicken, or pork. Simmer until the liquid is completely gone. You can also use about 1 tablespoon per can of black beans as a side dish as well.
**We did find that a pinch of salt was necessary for flavor in our dish, so add salt to taste!
Wednesday, June 27, 2012
Spaghetti Squash Au Gratin
Have you ever had spaghetti squash? If not, you should go to the store right now and get one. Seriously. Spaghetti squash are insanely easy to cook and taste just like shredded potatoes (at least in this dish). You can also substitute spaghetti squash in as pasta because it imitates the texture. The best thing about this squash is that it is low carb, but still delicious. We try to eat relatively healthy in our house, but we enjoy food too much to resort to the rabbit food lifestyle. So anytime I find a recipe that we love, but that is also healthy, it's goes into our permanent recipe file. This is definitely one for the permanent file!
Here's an even better bonus-the baby loved it too! She's not too picky about her food, but she does seem to really enjoy her meats and veggies. It wasn't a big surprise that she loved the squash, but it tickles us every time she gets excited about the food we make. We love her so much!
Spaghetti Squash Au Gratin
*Adapted from Dandy Dishes
1 large spaghetti squash
3 tablespoons butter
1 large shallot, finely chopped
3 cloves garlic, chopped
1/4 teaspoon red pepper flakes (we grind ours to a powder)
1 1/2 teaspoons fresh thyme
1/2 cup sour cream
4 ounces cream cheese, softened
1 cup shredded cheddar cheese
Kosher salt and pepper, to taste
Spaghetti squash are a little tough to cut. To do so, place your knife tip into the middle of the squash and press down lengthwise toward your cutting board. Repeat on the other side and split. Once you've cut it, remove the seeds. Place the halves in a dish, fill with about 1/2 inch water, and cover. Microwave for 12-15 minutes or until the squash is soft and the flesh scrapes off easily with a fork. (We did this part in batches because our dish wasn't large enough.)
Meanwhile, melt the butter in a skillet. Add the shallots and cook until translucent. Add the red pepper flakes, thyme, and salt and pepper. Cook a few more minutes, until the shallots are slightly brown. Add the garlic and cook for about 1 minute longer, until fragrant.
Combine the squash, shallot mixture, sour cream, cream cheese, and half the cheese in a large bowl and mix well. Transfer to a buttered baking dish and top with the remaining cheese. Bake for 25-35 minutes at 375º or until the top is golden brown.
Enjoy!
Labels:
brunch,
casserole,
cheese,
garlic,
herbs,
onions,
side dish,
squash,
vegetables,
vegetarian
Friday, June 22, 2012
CrockPot Kalua Pork
This is one of the best recipes I've ever tried. Other than a few minutes of prep work and the ten minutes it takes to shred, this pork is easy, flavorful, and makes enough for a crowd. Hubby and I will eat this with BBQ sauce on sandwiches or in tacos with spicy black beans and sour cream. It lasts for days! An added bonus is that our 8-month-old loves it too. The smoke flavor is pretty mild, but so delicious-it's even baby approved!
Kalua Pork
5-8 pound bone-in pork roast
1 1/2 tablespoons coarse sea salt
2 tablespoons liquid smoke
The first thing I learned about the prep work for this recipe is to wear gloves! Liquid smoke smell will stay on your hands all day if you don't wear those gloves. Pierce your pork roast all over with a fork (we use a tenderizing fork so we get some nice big holes). Make sure you get all sides.
Rub in your sea salt.
Place the roast in the CrockPot and cook on low until the meat starts to fall apart, anywhere from 8-12 hours, depending on the size, turning once. Remove the meat from the slow cooker and drain the juice into a bowl. Do NOT throw that out-that's the good stuff!
Shred your pork, removing the fat as you go. Return the shredded meat to the slow cooker and add in a few large spoonfuls of that delicious juice you saved. You'll know you have enough when the meat starts to look very moist. Cover and cook on low for about 30 minutes.
Serve in tacos or with BBQ sauce on sandwiches. Or be like my hubby and eat it right out of the CrockPot. Pat yourself on the back because this dish is SO good! And enjoy!
Kalua Pork
5-8 pound bone-in pork roast
1 1/2 tablespoons coarse sea salt
2 tablespoons liquid smoke
The first thing I learned about the prep work for this recipe is to wear gloves! Liquid smoke smell will stay on your hands all day if you don't wear those gloves. Pierce your pork roast all over with a fork (we use a tenderizing fork so we get some nice big holes). Make sure you get all sides.
Rub in your sea salt.
Pour on the liquid smoke and massage that in as well.
Place the roast in the CrockPot and cook on low until the meat starts to fall apart, anywhere from 8-12 hours, depending on the size, turning once. Remove the meat from the slow cooker and drain the juice into a bowl. Do NOT throw that out-that's the good stuff!
Shred your pork, removing the fat as you go. Return the shredded meat to the slow cooker and add in a few large spoonfuls of that delicious juice you saved. You'll know you have enough when the meat starts to look very moist. Cover and cook on low for about 30 minutes.
Serve in tacos or with BBQ sauce on sandwiches. Or be like my hubby and eat it right out of the CrockPot. Pat yourself on the back because this dish is SO good! And enjoy!
Friday, April 27, 2012
Zucchini Soup
Zucchini Soup
*Adapted from the Vitamix Whole Foods cookbook
2 cups chicken broth
1/2 cup milk
1 teaspoon lemon juice
1 medium zucchini, chopped
1 medium carrot, halved
1 stalk celery, chopped
1/4 cup potato flakes (or half a cooked baked potato)
1/4 teaspoon onion powder
Pinch salt
Fresh cracked pepper
Place all ingredients into the blender (you could certainly use a food processor and then cook this on the stove). Turn the blender on Variable 1 and quickly increase speed to Variable 10, then to high. Blend for 6-7 minutes or until heavy steam escapes from the vented lid. Serve and enjoy!
Labels:
brunch,
main dish,
onions,
potatoes,
soup,
vegetables,
vegetarian,
zucchini
Chicken Noodle Soup
I make this chicken noodle soup at least once a month and, since it makes such a large amount, Hubby and I eat it for a few days afterward. The best thing about these leftovers: they just get better and better. Another good thing about this recipe is that it is extremely easy. On nights I don't want to bother with cooking chicken, I pick up a whole roasted chicken from the store (Costco has the best ones!) and Hubby shreds it while I chop up veggies.
I know that chicken noodle soup isn't fancy or "special," but this is one of my all-time favorite recipes. I'd say it's definitely in the top five! This can be made last minute or you can let is simmer for a few hours and really get some amazing flavor out of the stock. As with most dishes, I think homemade chicken stock would make the soup extra delicious, but I always use boxed stock because it's a lot quicker and easier. Try this soup! I promise it won't disappoint!
Chicken Noodle Soup
4 chicken breasts, cooked and shredded (or a whole roasted chicken, shredded)
4 or 5 boxes of chicken stock (4-5 quarts of stock)
A 16-20 ounce bag of baby carrots, chopped small (the smaller the carrots, the quicker they will cook)
4-6 stalks of celery, chopped (about the same size as the carrots)
2 pound bag of egg noodles
A pinch of salt
Lots and lots of freshly cracked pepper
Add your veggies, chicken, salt, pepper, and 2 quarts of chicken stock to a large pot. Bring to a boil and then reduce heat. Simmer at medium heat for 45 minutes or at low heat for a few hours, or until the carrots and celery have softened.
Turn up the heat, add noodles and enough stock to cover, about 2-3 quarts, depending on how much the cooking liquid has reduced. Cook until the noodles are al dente. Serve immediately. Enjoy!
*This keeps well in a sealed container in the fridge for a few days. Just add a little bit of water before you heat it up to give it a little more broth.
Labels:
chicken,
Family recipes,
main dish,
pasta,
slow cooker,
soup,
vegetables
Saturday, April 14, 2012
Amazing Garlic Alfredo Sauce!
What makes this alfredo so amazing? How about the fact that there is no cream in it? Or maybe it's the non-oily nature of the sauce when it's reheated? But it might just be the simple deliciousness of it! Our whole house smelled of garlicky goodness while this was cooking. It came together so fast-so make sure you have all your ingredients ready before you start.
We really couldn't tell that there wasn't any cream, as the sauce was gooey and amazing. The lack of cream meant that, when reheated, this alfredo doesn't separate and get all oily. In this house, that makes this recipe a keeper! So, let's recap: yummy, garlicky, easy, quick, delicious, AND it reheats well. Score!
4 tablespoons butter
6 cloves garlic, finely minced
8 ounces of cream cheese (you can use low fat), softened and cut into pieces
2 cups milk (1% or 2% both work just fine)
1 1/2-2 cups grated parmesan cheese
1/2-1 teaspoon ground black pepper, to taste
1/2-1 teaspoon Kosher salt, to taste
1 pound fettuccine
In a large pot, boil noodles in salted water until just al dente.
In a large skillet, melt the butter over medium heat. Add the garlic and cook for about 2 minutes, stirring constantly to make sure the garlic doesn't burn. Add the cream cheese, stirring with a whisk until the mixture is smooth. It will look curdled at first, but with constant whisking for 2-3 minutes, it comes together to form a smooth, creamy paste.
Add the milk about 1/4 cup at a time, whisking as you go to fully incorporate it into the sauce. Stir in the parmesan cheese, pepper, and salt. Stir until the cheese is melted and the sauce is the desired consistency. The longer you cook it, the thicker the sauce will get. Serve immediately.
Enjoy!
We really couldn't tell that there wasn't any cream, as the sauce was gooey and amazing. The lack of cream meant that, when reheated, this alfredo doesn't separate and get all oily. In this house, that makes this recipe a keeper! So, let's recap: yummy, garlicky, easy, quick, delicious, AND it reheats well. Score!
Garlic Alfredo Sauce
*From Mel's Kitchen Cafe4 tablespoons butter
6 cloves garlic, finely minced
8 ounces of cream cheese (you can use low fat), softened and cut into pieces
2 cups milk (1% or 2% both work just fine)
1 1/2-2 cups grated parmesan cheese
1/2-1 teaspoon ground black pepper, to taste
1/2-1 teaspoon Kosher salt, to taste
1 pound fettuccine
In a large pot, boil noodles in salted water until just al dente.
In a large skillet, melt the butter over medium heat. Add the garlic and cook for about 2 minutes, stirring constantly to make sure the garlic doesn't burn. Add the cream cheese, stirring with a whisk until the mixture is smooth. It will look curdled at first, but with constant whisking for 2-3 minutes, it comes together to form a smooth, creamy paste.
Add the milk about 1/4 cup at a time, whisking as you go to fully incorporate it into the sauce. Stir in the parmesan cheese, pepper, and salt. Stir until the cheese is melted and the sauce is the desired consistency. The longer you cook it, the thicker the sauce will get. Serve immediately.
Enjoy!
Michael Symon's Mac and Cheese with Rosemary, Goat Cheese, and Prosciutto
This is one of those recipes that really makes you believe that a few simple, good ingredients put together in a dish can make an amazing meal. Goat cheese, rosemary, and prosciutto mac and cheese is decadent and delicious. It was so easy to put together and reheated pretty well. While the original recipe called for shredded chicken, we chose to use the prosciutto and cut back on the salt. The result was well balanced and really yummy. I'm so glad to have this dish as one in our permanent recipe file. Hubby loved it too-we fought over the leftovers!
Rigatoni with Rosemary, Goat Cheese, and Prosciutto
*From Michael Symon
Kosher salt
Pepper
1 pound rigatoni
4 cups heavy cream
2 tablespoons rosemary, chopped
8 ounces goat cheese
4-6 slices prosciutto, chopped (or you could use shredded chicken or bacon-or leave all meat out and make it vegetarian)
Bring a large pot of salted water to a boil. In a large saucepan over high heat, add heavy cream, rosemary, a pinch of salt, and pepper. Bring just to a simmer and then lower the heat to medium. Simmer until the mixture is reduced by half, about 20 minutes. Continue cooking until it coats the back of a spoon.
Add the rigatoni to the boiling water and cook until just al dente, about 10 minutes. Drain the pasta, reserving a cup of cooking liquid. Add chunks of goat cheese to the sauce. Stir and add pasta, thinning with cooking liquid, if necessary.
Bring sauce back to just a simmer and adjust seasoning to taste.
Enjoy!
Rigatoni with Rosemary, Goat Cheese, and Prosciutto
*From Michael Symon
Kosher salt
Pepper
1 pound rigatoni
4 cups heavy cream
2 tablespoons rosemary, chopped
8 ounces goat cheese
4-6 slices prosciutto, chopped (or you could use shredded chicken or bacon-or leave all meat out and make it vegetarian)
Bring a large pot of salted water to a boil. In a large saucepan over high heat, add heavy cream, rosemary, a pinch of salt, and pepper. Bring just to a simmer and then lower the heat to medium. Simmer until the mixture is reduced by half, about 20 minutes. Continue cooking until it coats the back of a spoon.
Add the rigatoni to the boiling water and cook until just al dente, about 10 minutes. Drain the pasta, reserving a cup of cooking liquid. Add chunks of goat cheese to the sauce. Stir and add pasta, thinning with cooking liquid, if necessary.
Bring sauce back to just a simmer and adjust seasoning to taste.
Enjoy!
Sunday, April 1, 2012
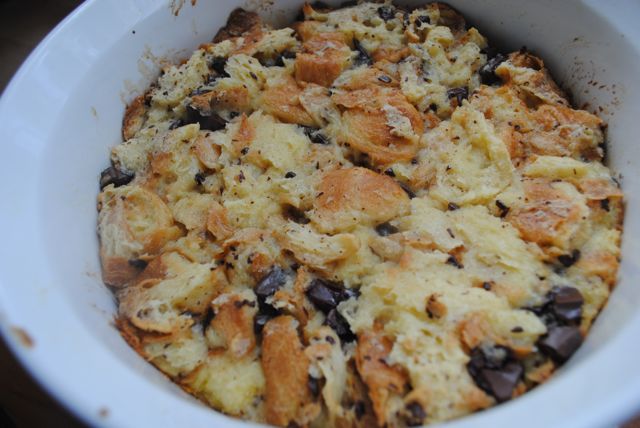
Pain Au Chocolat (Croissant and Dark Chocolate) Bread Pudding
I am a firm believer in enjoying life as much as possible, particularly since it is so short. Good food is essential to a happy life, and this is good food. Decadent, rich, deliciously good food. Pain au chocolat is a pastry that you can find in any boulangerie or patisserie in France. It's basically a croissant with a piece of dark chocolate in the middle. It's light, but rich because of the chocolate and it's wonderful. We've been unable to find one locally that stands up to those we ate in France.
Enter Pain Au Chocolat Bread Pudding. It isn't quite the same, but as a dessert, dare I say that it is better? Sprinkle some powdered sugar on top or add some sliced strawberries and you have my new favorite dessert with a fancy topping. This was truly a special dish, one that I will make for special occasions from now on, since, let's face it, heavy cream and croissants with dark chocolate isn't exactly body healthy. It is good for my soul though!
Pain Au Chocolat Bread Pudding
*From The Comfort of Cooking
Nonstick cooking spray
3 large egg yokes
1 cup milk
1/2 cup heavy cream
1/2 cup sugar
1/2 teaspoon vanilla extract
1/4 teaspoon kosher salt
1/4 teaspoon ground nutmeg
3 croissants, cut into 1-inch pieces
2 ounces bittersweet chocolate, cut into small pieces
Heat oven to 375º. Coat a 2-quart baking dish with cooking spray and set aside.
In a large bowl, whisk the egg yolks, milk, cream, sugar, vanilla, salt, and nutmeg. Add the croissants and chocolate and mix to combine.
Transfer the mixture to the prepared baking dish.
Bake until set and a knife inserted in the center comes out clean, about 30 minutes. Serve warm or at room temperature. Serves 4.
Enjoy!
Saturday, March 31, 2012
Asparagus and Parmesan Frittata
Lately, I'm lucky if I can sit down for 10 minutes to enjoy my food. Baby girl is coming up on 6 months and she keeps me BUSY! I think this blog has, therefore, turned into just a way for me to keep track of recipes that we liked, without the photos that take an extra 10 minutes that I just don't have anymore. I'll do my best to take at least one photo of each dish, but I can't promise anything.
Unfortunately, this delicious (and EASY!) frittata didn't make it to the picture table. I had intended on taking one, and then I burned my hand on the handle of the skillet. Ouch! Besides my stinging fingers, this meal was a hit. It was incredibly easy, versatile, and quick, which makes it the perfect meal in this house with Little Miss Needs Attention!
Asparagus and Parmesan Frittata
2 tablespoons margarine or butter
12 eggs, beaten
1/2 cup milk or half and half
1 package chopped asparagus, cooked and drained (find these in your freezer section-I used Green Giant, which steams in its own package)
1/4 cup grated parmesan cheese
*You could add bacon, chicken, ham, turkey, or different veggies and herbs to mix it up too.
Preheat oven to 350º. Whip eggs with a hand mixer and then whisk in the milk. In a large skillet over medium heat, melt the butter. Add the cooked asparagus and stir. Add the eggs and season with salt and pepper. Stir and cook for 2-3 minutes until the eggs are slightly set.
Sprinkle parmesan cheese on top and transfer the skillet to the oven. Cook until the eggs have set, about 15 minutes. CAREFULLY remove the skillet from the oven and keep the hot pad on the handle so you don't burn yourself like I did!
Enjoy!
Unfortunately, this delicious (and EASY!) frittata didn't make it to the picture table. I had intended on taking one, and then I burned my hand on the handle of the skillet. Ouch! Besides my stinging fingers, this meal was a hit. It was incredibly easy, versatile, and quick, which makes it the perfect meal in this house with Little Miss Needs Attention!
Asparagus and Parmesan Frittata
2 tablespoons margarine or butter
12 eggs, beaten
1/2 cup milk or half and half
1 package chopped asparagus, cooked and drained (find these in your freezer section-I used Green Giant, which steams in its own package)
1/4 cup grated parmesan cheese
*You could add bacon, chicken, ham, turkey, or different veggies and herbs to mix it up too.
Preheat oven to 350º. Whip eggs with a hand mixer and then whisk in the milk. In a large skillet over medium heat, melt the butter. Add the cooked asparagus and stir. Add the eggs and season with salt and pepper. Stir and cook for 2-3 minutes until the eggs are slightly set.
Sprinkle parmesan cheese on top and transfer the skillet to the oven. Cook until the eggs have set, about 15 minutes. CAREFULLY remove the skillet from the oven and keep the hot pad on the handle so you don't burn yourself like I did!
Enjoy!
Subscribe to:
Posts (Atom)