Friday, April 27, 2012

Zucchini Soup

Hubby got me a Vitamix blender to celebrate getting our tax return and I'm a little obsessed with it. This soup took all of 5 minutes to put together and it was really yummy. Plus, it cooks in the blender, meaning no pot to clean! Healthy, easy, and delicious all rolled in one? Yes, please!

Zucchini Soup
*Adapted from the Vitamix Whole Foods cookbook

2 cups chicken broth
1/2 cup milk
1 teaspoon lemon juice
1 medium zucchini, chopped
1 medium carrot, halved
1 stalk celery, chopped
1/4 cup potato flakes (or half a cooked baked potato)
1/4 teaspoon onion powder
Pinch salt
Fresh cracked pepper

Place all ingredients into the blender (you could certainly use a food processor and then cook this on the stove). Turn the blender on Variable 1 and quickly increase speed to Variable 10, then to high. Blend for 6-7 minutes or until heavy steam escapes from the vented lid. Serve and enjoy!

Chicken Noodle Soup

I make this chicken noodle soup at least once a month and, since it makes such a large amount, Hubby and I eat it for a few days afterward. The best thing about these leftovers: they just get better and better. Another good thing about this recipe is that it is extremely easy. On nights I don't want to bother with cooking chicken, I pick up a whole roasted chicken from the store (Costco has the best ones!) and Hubby shreds it while I chop up veggies. 

I know that chicken noodle soup isn't fancy or "special," but this is one of my all-time favorite recipes. I'd say it's definitely in the top five! This can be made last minute or you can let is simmer for a few hours and really get some amazing flavor out of the stock. As with most dishes, I think homemade chicken stock would make the soup extra delicious, but I always use boxed stock because it's a lot quicker and easier. Try this soup! I promise it won't disappoint!

Chicken Noodle Soup


4 chicken breasts, cooked and shredded (or a whole roasted chicken, shredded)
4 or 5 boxes of chicken stock (4-5 quarts of stock)
A 16-20 ounce bag of baby carrots, chopped small (the smaller the carrots, the quicker they will cook)
4-6 stalks of celery, chopped (about the same size as the carrots)
2 pound bag of egg noodles
A pinch of salt
Lots and lots of freshly cracked pepper

Add your veggies, chicken, salt, pepper, and 2 quarts of chicken stock to a large pot. Bring to a boil and then reduce heat. Simmer at medium heat for 45 minutes or at low heat for a few hours, or until the carrots and celery have softened.

Turn up the heat, add noodles and enough stock to cover, about 2-3 quarts, depending on how much the cooking liquid has reduced. Cook until the noodles are al dente. Serve immediately. Enjoy!

*This keeps well in a sealed container in the fridge for a few days. Just add a little bit of water before you heat it up to give it a little more broth.

Saturday, April 14, 2012

Amazing Garlic Alfredo Sauce!

 What makes this alfredo so amazing? How about the fact that there is no cream in it? Or maybe it's the non-oily nature of the sauce when it's reheated? But it might just be the simple deliciousness of it! Our whole house smelled of garlicky goodness while this was cooking. It came together so fast-so make sure you have all your ingredients ready before you start.

We really couldn't tell that there wasn't any cream, as the sauce was gooey and amazing. The lack of cream meant that, when reheated, this alfredo doesn't separate and get all oily. In this house, that makes this recipe a keeper! So, let's recap: yummy, garlicky, easy, quick, delicious, AND it reheats well. Score!
Garlic Alfredo Sauce
*From Mel's Kitchen Cafe

4 tablespoons butter
6 cloves garlic, finely minced
8 ounces of cream cheese (you can use low fat), softened and cut into pieces
2 cups milk (1% or 2% both work just fine)
1 1/2-2 cups grated parmesan cheese
1/2-1 teaspoon ground black pepper, to taste
1/2-1 teaspoon Kosher salt, to taste
1 pound fettuccine

In a large pot, boil noodles in salted water until just al dente.

In a large skillet, melt the butter over medium heat. Add the garlic and cook for about 2 minutes, stirring constantly to make sure the garlic doesn't burn. Add the cream cheese, stirring with a whisk until the mixture is smooth. It will look curdled at first, but with constant whisking for 2-3 minutes, it comes together to form a smooth, creamy paste.

Add the milk about 1/4 cup at a time, whisking as you go to fully incorporate it into the sauce. Stir in the parmesan cheese, pepper, and salt. Stir until the cheese is melted and the sauce is the desired consistency. The longer you cook it, the thicker the sauce will get. Serve immediately.

Enjoy!

Michael Symon's Mac and Cheese with Rosemary, Goat Cheese, and Prosciutto

 This is one of those recipes that really makes you believe that a few simple, good ingredients put together in a dish can make an amazing meal. Goat cheese, rosemary, and prosciutto mac and cheese is decadent and delicious. It was so easy to put together and reheated pretty well. While the original recipe called for shredded chicken, we chose to use the prosciutto and cut back on the salt. The result was well balanced and really yummy. I'm so glad to have this dish as one in our permanent recipe file. Hubby loved it too-we fought over the leftovers!


Rigatoni with Rosemary, Goat Cheese, and Prosciutto
*From Michael Symon

Kosher salt
Pepper
1 pound rigatoni
4 cups heavy cream
2 tablespoons rosemary, chopped
8 ounces goat cheese
4-6 slices prosciutto, chopped (or you could use shredded chicken or bacon-or leave all meat out and make it vegetarian)

Bring a large pot of salted water to a boil. In a large saucepan over high heat, add heavy cream, rosemary, a pinch of salt, and pepper. Bring just to a simmer and then lower the heat to medium. Simmer until the mixture is reduced by half, about 20 minutes. Continue cooking until it coats the back of a spoon.

Add the rigatoni to the boiling water and cook until just al dente, about 10 minutes. Drain the pasta, reserving a cup of cooking liquid. Add chunks of goat cheese to the sauce. Stir and add pasta, thinning with cooking liquid, if necessary.

Bring sauce back to just a simmer and adjust seasoning to taste.

Enjoy!

Sunday, April 1, 2012

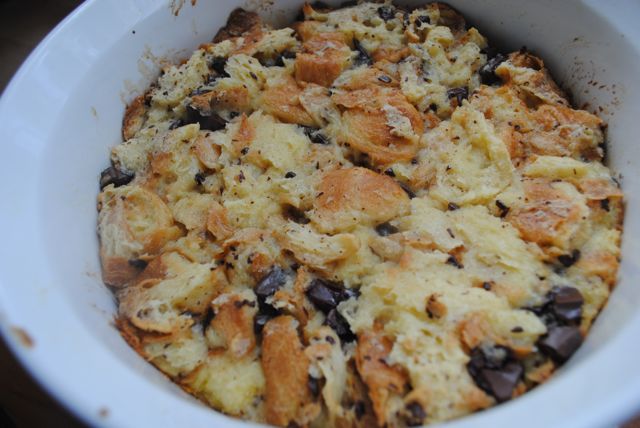
Pain Au Chocolat (Croissant and Dark Chocolate) Bread Pudding


I am a firm believer in enjoying life as much as possible, particularly since it is so short. Good food is essential to a happy life, and this is good food. Decadent, rich, deliciously good food. Pain au chocolat is a pastry that you can find in any boulangerie or patisserie in France. It's basically a croissant with a piece of dark chocolate in the middle. It's light, but rich because of the chocolate and it's wonderful. We've been unable to find one locally that stands up to those we ate in France.

Enter Pain Au Chocolat Bread Pudding. It isn't quite the same, but as a dessert, dare I say that it is better? Sprinkle some powdered sugar on top or add some sliced strawberries and you have my new favorite dessert with a fancy topping. This was truly a special dish, one that I will make for special occasions from now on, since, let's face it, heavy cream and croissants with dark chocolate isn't exactly body healthy. It is good for my soul though!

Pain Au Chocolat Bread Pudding 
*From The Comfort of Cooking

Nonstick cooking spray
3 large egg yokes
1 cup milk
1/2 cup heavy cream
1/2 cup sugar
1/2 teaspoon vanilla extract
1/4 teaspoon kosher salt
1/4 teaspoon ground nutmeg
3 croissants, cut into 1-inch pieces
2 ounces bittersweet chocolate, cut into small pieces

Heat oven to 375º. Coat a 2-quart baking dish with cooking spray and set aside.

In a large bowl, whisk the egg yolks, milk, cream, sugar, vanilla, salt, and nutmeg. Add the croissants and chocolate and mix to combine.

Transfer the mixture to the prepared baking dish. 

Bake until set and a knife inserted in the center comes out clean, about 30 minutes. Serve warm or at room temperature. Serves 4.

Enjoy!

Saturday, March 31, 2012

Asparagus and Parmesan Frittata

Lately, I'm lucky if I can sit down for 10 minutes to enjoy my food. Baby girl is coming up on 6 months and she keeps me BUSY! I think this blog has, therefore, turned into just a way for me to keep track of recipes that we liked, without the photos that take an extra 10 minutes that I just don't have anymore. I'll do my best to take at least one photo of each dish, but I can't promise anything.

Unfortunately, this delicious (and EASY!) frittata didn't make it to the picture table. I had intended on taking one, and then I burned my hand on the handle of the skillet. Ouch! Besides my stinging fingers, this meal was a hit. It was incredibly easy, versatile, and quick, which makes it the perfect meal in this house with Little Miss Needs Attention!

Asparagus and Parmesan Frittata

2 tablespoons margarine or butter
12 eggs, beaten
1/2 cup milk or half and half
1 package chopped asparagus, cooked and drained (find these in your freezer section-I used Green Giant, which steams in its own package)
1/4 cup grated parmesan cheese

*You could add bacon, chicken, ham, turkey, or different veggies and herbs to mix it up too.

Preheat oven to 350º. Whip eggs with a hand mixer and then whisk in the milk. In a large skillet over medium heat, melt the butter. Add the cooked asparagus and stir. Add the eggs and season with salt and pepper. Stir and cook for 2-3 minutes until the eggs are slightly set.

Sprinkle parmesan cheese on top and transfer the skillet to the oven. Cook until the eggs have set, about 15 minutes. CAREFULLY remove the skillet from the oven and keep the hot pad on the handle so you don't burn yourself like I did!

Enjoy!

Tuesday, February 28, 2012

Brown Butter and Sage Sauce

I made this sauce to cover mushroom ravioli. It was done so quickly, and eaten even faster, so I didn't get a chance to take pictures. But I promise, it was delicious! So much better than the jarred pasta sauces I usually use for quick dishes like this. I always have these ingredients on hand, so I'm making this my go-to sauce for pasta from now on. Sage, brown butter, parmesan, and lemon juice-oh YES!

Brown Butter and Sage Sauce
* From Mario Batali

Pasta, of choice
4 tablespoons salted butter
8 sage leaves (leave whole or tear into pieces)
1/2 lemon, juiced
1/4 cup grated parmesan

While your pasta cooks, melt the butter in a 12 to 14-inch sauté pan and continue cooking until golden brown color appears in the thinnest liquid of the butter. Add sage leaves and remove from heat. Add lemon juice and set aside. Drain the pasta, reserving some of the cooking water, and gently pour the pasta into the sauté pan and return to heat. Add the cheese and toss to coat. Use the pasta water to thin a bit, if necessary.

Enjoy!

Hubby's Favorite Apple Crisp

Somehow I didn't take a single picture of this recipe. Maybe that's because Hubby ate it so quickly. I, on the other hand, didn't eat any of it. This recipe was too sweet for me, but I've come to realize that I don't really like very sweet flavors. I love my mom's apple crisp, which I make with Granny Smith apples for that tart bite. I'm glad I used Granny Smiths in this recipe too, since it cut the sweetness a bit. Hubby declared this his new favorite apple crisp recipe. I guess next time I make it for him, I'll have to take a picture!

Hubby's Favorite Apple Crisp
*From Mommy's Kitchen

Filling:
4-5 apples, peeled and sliced (I used Granny Smith apples)
1/2 cup sugar
1 tablespoon cinnamon
1/2 cup apple cider or apple juice (I used about 2/3 of a cup)
1 teaspoon vanilla extract

Topping:
1 cup all purpose flour
1 cup sugar
1 stick cold margarine (not butter)

Preheat oven to 400º. In a small bowl, mix the cinnamon and sugar together. Add a single layer of cinnamon sugar onto the bottom of an ungreased 8x8 or 9x9 inch baking pan.

Layer sliced apples, sprinkling the cinnamon sugar mixture in between each layer. Make sure to use enough of the mixture to cover each layer.

Once the apples are to the top of the pan, cover with a final layer of cinnamon and sugar. Mix the vanilla extract and apple cider together in a measuring cup. Pour the apple cider mixture over the apples.

Using a pastry cutter or fork, blend the 3 topping ingredients together until crumbly. Cover the apples with the topping and bake for 25-35 minutes until golden brown and bubbly. Cool and serve.

Enjoy!

Thursday, January 26, 2012

Coconut Almond Granola


I have a hard time with snack foods. I don't want crackers, I want a steak or some leftover chicken noodle soup or pasta. Usually I reach for something a little more hearty than a handful of granola, but this is special granola. It has coconut and almonds, two of my favorite things. Add in some cinnamon (which you do!) and you've got yourself a yummy treat!

This recipe called for chia seeds, which I was all for using, but chia seeds are expensive! The brand is Bob's Red Mill and you can find them in the whole foods aisle. I didn't know if I would like the recipe, since I've never made granola before, so I didn't buy the seeds. A single batch of granola only calls for 2 tablespoons of chia seeds, which means a bag would last a long time. I might go buy the seeds for next time, since I'm sure I'll be making this recipe again and again. It's delicious, especially on Greek yogurt or even ice cream!

Coconut Almond Granola
*Adapted from The Vintage Mixer

3 1/2 cups coconut flakes, sweetened or unsweetened, depending on your taste
2/3 cup oats
1/2 cup almonds, chopped
2 tablespoons chia seeds (I left these out this time)
1 teaspoon ground cinnamon
1/3 cup coconut oil (mine was in solid form, so I heated it in the microwave until it liquified)
Dash of salt

Preheat oven to 350º. Combine all ingredients in a bowl and spread the mixture evenly onto a baking sheet. Bake for 15 minutes and then turn everything with a spatula. Spread it back out and cook for an additional 10 minutes or until just golden.

Cool, then store in an airtight container in the fridge for 3-5 days. This is good over ice cream, Greek yogurt, apple sauce, with milk, or just straight out of the jar!

Enjoy!

Friday, January 13, 2012

Sourdough, Apple, and Shallot Stuffing-The BEST Stuffing Ever!


Hubby and I are very particular about our stuffing. We like lots of flavor and a bit of crispiness in our bread. For us, stuffing should be a wonderful side dish that can stand up to the rest of a holiday meal and be memorable in and of itself. This stuffing took me a while to perfect, but once I did, it became our favorite part of Thanksgiving. I make this dish all the time so that we get to enjoy it more than once a year because it's too good to eat just once. You can't go wrong with apples, shallots, herbs, and the delicious taste of sourdough bread!

Sorry for the picture; I never got a final one. But it's good and beautiful, I promise!

Sourdough, Apple, and Shallot Stuffing

2 large loaves sourdough bread (we use 2 large boules)
1 stick butter
1 or 2 shallots, diced
2 or 3 Granny Smith apples, peeled, cored, and diced
4 1/2 cups chicken broth
1/2 teaspoon dried basil
1/2 teaspoon thyme
2-3 teaspoons chopped fresh rosemary
1/4 cup chopped fresh parsley
Salt, to taste

Chop the bread into 1-inch cubes and set on cookie sheets to dry overnight or toast in a 350º oven for 3-45 minutes or until slightly crispy, but not browned.

Melt butter in a large skillet over medium heat. When it's melted, add the shallot and apple and cook until the shallot is translucent, about 5 minutes. Add 4 1/2 cups chicken broth and bring to a boil. Add in the herbs and stir to combine.

Place dried breadcrumbs in a large bowl and gently mix. Add in the broth mixture a ladleful at a time and gently toss to coat. Taste as you to adjust seasonings. Add in salt to taste. If the breadcrumbs are still a little dry once you've added all the broth mixture, add more broth and toss again.

Pour stuffing into a large baking dish and bake in a 350º oven for 20-30 minutes or until golden brown on top. Enjoy!