I made this sauce to cover mushroom ravioli. It was done so quickly, and eaten even faster, so I didn't get a chance to take pictures. But I promise, it was delicious! So much better than the jarred pasta sauces I usually use for quick dishes like this. I always have these ingredients on hand, so I'm making this my go-to sauce for pasta from now on. Sage, brown butter, parmesan, and lemon juice-oh YES!
Brown Butter and Sage Sauce
* From Mario Batali
Pasta, of choice
4 tablespoons salted butter
8 sage leaves (leave whole or tear into pieces)
1/2 lemon, juiced
1/4 cup grated parmesan
While your pasta cooks, melt the butter in a 12 to 14-inch sauté pan and continue cooking until golden brown color appears in the thinnest liquid of the butter. Add sage leaves and remove from heat. Add lemon juice and set aside. Drain the pasta, reserving some of the cooking water, and gently pour the pasta into the sauté pan and return to heat. Add the cheese and toss to coat. Use the pasta water to thin a bit, if necessary.
Enjoy!
Tuesday, February 28, 2012

Hubby's Favorite Apple Crisp
Somehow I didn't take a single picture of this recipe. Maybe that's because Hubby ate it so quickly. I, on the other hand, didn't eat any of it. This recipe was too sweet for me, but I've come to realize that I don't really like very sweet flavors. I love my mom's apple crisp, which I make with Granny Smith apples for that tart bite. I'm glad I used Granny Smiths in this recipe too, since it cut the sweetness a bit. Hubby declared this his new favorite apple crisp recipe. I guess next time I make it for him, I'll have to take a picture!
Hubby's Favorite Apple Crisp
*From Mommy's Kitchen
Filling:
4-5 apples, peeled and sliced (I used Granny Smith apples)
1/2 cup sugar
1 tablespoon cinnamon
1/2 cup apple cider or apple juice (I used about 2/3 of a cup)
1 teaspoon vanilla extract
Topping:
1 cup all purpose flour
1 cup sugar
1 stick cold margarine (not butter)
Preheat oven to 400º. In a small bowl, mix the cinnamon and sugar together. Add a single layer of cinnamon sugar onto the bottom of an ungreased 8x8 or 9x9 inch baking pan.
Layer sliced apples, sprinkling the cinnamon sugar mixture in between each layer. Make sure to use enough of the mixture to cover each layer.
Once the apples are to the top of the pan, cover with a final layer of cinnamon and sugar. Mix the vanilla extract and apple cider together in a measuring cup. Pour the apple cider mixture over the apples.
Using a pastry cutter or fork, blend the 3 topping ingredients together until crumbly. Cover the apples with the topping and bake for 25-35 minutes until golden brown and bubbly. Cool and serve.
Enjoy!
Hubby's Favorite Apple Crisp
*From Mommy's Kitchen
Filling:
4-5 apples, peeled and sliced (I used Granny Smith apples)
1/2 cup sugar
1 tablespoon cinnamon
1/2 cup apple cider or apple juice (I used about 2/3 of a cup)
1 teaspoon vanilla extract
Topping:
1 cup all purpose flour
1 cup sugar
1 stick cold margarine (not butter)
Preheat oven to 400º. In a small bowl, mix the cinnamon and sugar together. Add a single layer of cinnamon sugar onto the bottom of an ungreased 8x8 or 9x9 inch baking pan.
Layer sliced apples, sprinkling the cinnamon sugar mixture in between each layer. Make sure to use enough of the mixture to cover each layer.
Once the apples are to the top of the pan, cover with a final layer of cinnamon and sugar. Mix the vanilla extract and apple cider together in a measuring cup. Pour the apple cider mixture over the apples.
Using a pastry cutter or fork, blend the 3 topping ingredients together until crumbly. Cover the apples with the topping and bake for 25-35 minutes until golden brown and bubbly. Cool and serve.
Enjoy!
Thursday, January 26, 2012
Coconut Almond Granola

I have a hard time with snack foods. I don't want crackers, I want a steak or some leftover chicken noodle soup or pasta. Usually I reach for something a little more hearty than a handful of granola, but this is special granola. It has coconut and almonds, two of my favorite things. Add in some cinnamon (which you do!) and you've got yourself a yummy treat!
This recipe called for chia seeds, which I was all for using, but chia seeds are expensive! The brand is Bob's Red Mill and you can find them in the whole foods aisle. I didn't know if I would like the recipe, since I've never made granola before, so I didn't buy the seeds. A single batch of granola only calls for 2 tablespoons of chia seeds, which means a bag would last a long time. I might go buy the seeds for next time, since I'm sure I'll be making this recipe again and again. It's delicious, especially on Greek yogurt or even ice cream!
Coconut Almond Granola
*Adapted from The Vintage Mixer
3 1/2 cups coconut flakes, sweetened or unsweetened, depending on your taste
2/3 cup oats
1/2 cup almonds, chopped
2 tablespoons chia seeds (I left these out this time)
1 teaspoon ground cinnamon
1/3 cup coconut oil (mine was in solid form, so I heated it in the microwave until it liquified)
Dash of salt
Preheat oven to 350º. Combine all ingredients in a bowl and spread the mixture evenly onto a baking sheet. Bake for 15 minutes and then turn everything with a spatula. Spread it back out and cook for an additional 10 minutes or until just golden.
Cool, then store in an airtight container in the fridge for 3-5 days. This is good over ice cream, Greek yogurt, apple sauce, with milk, or just straight out of the jar!
Enjoy!
Friday, January 13, 2012
Sourdough, Apple, and Shallot Stuffing-The BEST Stuffing Ever!

Hubby and I are very particular about our stuffing. We like lots of flavor and a bit of crispiness in our bread. For us, stuffing should be a wonderful side dish that can stand up to the rest of a holiday meal and be memorable in and of itself. This stuffing took me a while to perfect, but once I did, it became our favorite part of Thanksgiving. I make this dish all the time so that we get to enjoy it more than once a year because it's too good to eat just once. You can't go wrong with apples, shallots, herbs, and the delicious taste of sourdough bread!
Sorry for the picture; I never got a final one. But it's good and beautiful, I promise!
Sourdough, Apple, and Shallot Stuffing
2 large loaves sourdough bread (we use 2 large boules)
1 stick butter
1 or 2 shallots, diced
2 or 3 Granny Smith apples, peeled, cored, and diced
4 1/2 cups chicken broth
1/2 teaspoon dried basil
1/2 teaspoon thyme
2-3 teaspoons chopped fresh rosemary
1/4 cup chopped fresh parsley
Salt, to taste
Chop the bread into 1-inch cubes and set on cookie sheets to dry overnight or toast in a 350º oven for 3-45 minutes or until slightly crispy, but not browned.

Melt butter in a large skillet over medium heat. When it's melted, add the shallot and apple and cook until the shallot is translucent, about 5 minutes. Add 4 1/2 cups chicken broth and bring to a boil. Add in the herbs and stir to combine.

Place dried breadcrumbs in a large bowl and gently mix. Add in the broth mixture a ladleful at a time and gently toss to coat. Taste as you to adjust seasonings. Add in salt to taste. If the breadcrumbs are still a little dry once you've added all the broth mixture, add more broth and toss again.
Pour stuffing into a large baking dish and bake in a 350º oven for 20-30 minutes or until golden brown on top. Enjoy!
Pumpkin and Apple Soup


Pumpkin and Apple Soup
*Adapted from Brown Eyed Baker
1 tablespoon olive oil
1 shallot, diced
2 Granny Smith apples, peeled, cored, and diced
3/4 teaspoon kosher salt
6 cups chicken stock
2/3 cup no sugar added applesauce
1/2 teaspoon ground white pepper
1/2 teaspoon ground sage
1/2 teaspoon dried thyme
1/4 teaspoon ground nutmeg
2 15-ounce cans pumpkin
1/4 cup brown sugar
1/2 cup cream
Fresh ground black pepper for serving
Heat a Dutch oven or large soup pot over medium heat. Add the olive oil and heat until it shimmers. Add the diced shallot, apples, and salt. Sauté until shallot is translucent, about 7 minutes. Add the chicken stock, applesauce, white pepper, sage, thyme, and nutmeg. Bring to a boil and until apples are very tender, about 5 more minutes.
Add the pumpkin and brown sugar and cook for 10-15 minutes over medium heat. Use an immersion blender to blend soup until it's smooth or use a blender to blend the soup in batches. Add the cream to the soup and heat through over very low heat. Add more cream or water if necessary to thin it out. Remove from heat and serve with fresh ground pepper as desired.
Enjoy!
Slow Cooker Cinnamon Applesauce

I love a recipe that makes the entire house smell like warmth and yumminess. I can achieve that with a great roast or baked dessert, but the best smell comes from any dish that includes cinnamon. This recipe for applesauce really sent the aroma of cinnamon wafting through our house. I was so excited to try this applesauce and it didn't disappoint!
This might be one of those recipes that I shouldn't mess with because it really was yummy as is, but I have a few changes I'm going to try next time. The first is switching out the white sugar for brown sugar. I'm also going to add nutmeg, cloves, and maybe a little bit of vanilla extract. I love that I have a great basic recipe though. I only wish it had made more! Once you mash it, the amount reduces by about half. Something to keep in mind for next time.

Emma helped Momma make applesauce! (Please ignore the clutter and mess in my kitchen. Having a baby and holiday time combine to make it impossible to keep my house clean!)
Slow Cooker Cinnamon Applesauce
*Slightly adapted from What Megan's Making
3 pounds of apples (6-9), peeled, cored, and cut into 1 1/2 inch chunks
1 cup apple cider or apple juice, plus more as needed
2 tablespoons sugar, plus more as needed
Pinch salt
2 cinnamon sticks (optional)
1/4-1/2 teaspoon cinnamon
Combine apples, cider or juice, sugar, salt, and cinnamon sticks in a slow cooker. Cover and cook on low until apples are very soft and beginning to disintegrate, between 3-4 hours on low. Remove cinnamon sticks if using. Mash with a potato masher or immersion blender to desired consistency. Season with cinnamon and additional sugar to taste and adjust consistency with additional hot apple juice or cider as needed.
*Recommended apples: Jonagold, Pink Lady, Jonathon, Golden Delicious, Rome, Mcintosh, Empire
*Not Recommended: Granny Smith, Red Delicious, Braeburn, Cortland, Baldwin, Honeycrisp, Norther Spy
Cinnamon Roll Cake with Cinnabon Frosting
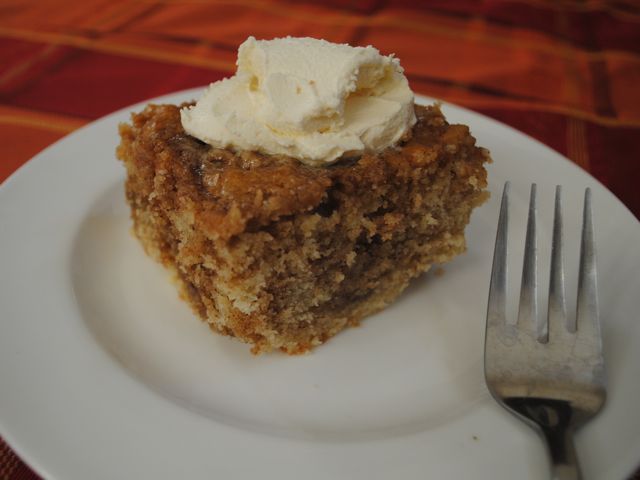

If you're looking for a quick fix to curb a cinnamon roll craving, this is the way to go. The cake is delicious and easy, but the frosting. Oh the frosting. This IS the Cinnabon frosting. It. Is. So. Good. Make it and eat it with a spoon. Go ahead, I won't tell anyone!

Cinnamon Roll Cake with Cinnabon Frosting
*From Life as a Lofthouse
*Frosting from CDKitchen
Cake:
3 cups flour
1/4 teaspoon salt
1 cup sugar
4 teaspoons baking powder
1 1/2 cups milk
2 eggs
2 teaspoons vanilla
1/2 cup (1 stick) butter, melted
Topping:
1 cup (2 sticks) butter, softened
1 cup brown sugar
2 tablespoons flour
1 tablespoon cinnamon
Frosting:
1 cup (2 sticks) margarine, room temperature
1 package cream cheese, room temperature
2 cups powdered sugar
1 teaspoon lemon juice
1 teaspoon vanilla extract
For the cake:
Preheat oven to 350º. Spray a 9x13 glass baking pan with cooking spray and set aside. In an stand mixer, add the flour, salt, sugar, baking powder, milk, eggs, and vanilla. Once well combined, slowly stir in the melted butter. Pour into the prepared baking pan.
For the topping:
In a large bowl, mix the 2 sticks of butter, brown sugar, flour, and cinnamon together until well combined and creamy (I used an electric hand mixer). Drop evenly over the batter by tablespoonfuls and use a knife to marble/swirl it through the cake.
Bake at 350º for 25-35 minutes or until a toothpick inserted near the center comes out nearly clean.
For the frosting:
Beat cream cheese and margarine together in a large bowl with a mixer. Slowly add in all powdered sugar. Once all of the sugar is in the bowl, mix for AT LEAST an additional 12 minutes until light and fluffy. With about a minute left on mix time, add in the lemon juice and vanilla.
Frost the cake when warm or cool or serve the frosting on the side to be used on warmed cake.
Enjoy!
Wednesday, December 21, 2011
Eggnog Pancakes

Trying to get back into the kitchen has been difficult with a new baby, to say the least. I've been cooking a lot of recipes that we are familiar with, so there hasn't been much to post on the blog. However, this morning I got the itch to cook something new, so I decided to try this recipe for eggnog pancakes. I'm not a fan of eggnog myself, but the hubby loves it and we found some pumpkin eggnog that I actually really like, so I used it in this recipe. The pancakes turned out really yummy, but are very thick and cake-like. Next time I will thin the batter with a little bit of plain milk, but Hubby loved the cakey, fluffy texture. These would be a great Christmas breakfast if you are going for something simple and quick!

Eggnog Pancakes
*Adapted from Taste of Home
2 cups all-purpose flour
4 teaspoons baking powder
1/2 teaspoon salt
1/2 teaspoon ground nutmeg
1/2 teaspoon cinnamon
2 eggs, lightly beaten
2 cups eggnog (I used pumpkin eggnog)
2 tablespoons butter, melted
Milk, for thinning
In a large bowl, combine the flour, baking powder, salt, nutmeg, and cinnamon.

Whisk the eggs, eggnog, and butter in a small bowl.

Stir wet ingredients into dry and mix until just moistened. Add milk to thin if necessary. Pour batter by 1/4 cupfuls onto a lightly greased griddle. Turn when bubbles form on top and cook until second side is browned. If the batter is thick, bubbles will not form, so watch the pancakes closely while cooking.
Enjoy!
Saturday, November 12, 2011
Nana's Chili


Now for the food! About a week after Em was born, I was really craving comfort food and this recipe wouldn't leave my mind. This is my Nana's (better known as Naomi!) recipe, so it was fitting that I make it to celebrate Emma's arrival. Nana may not have been here to welcome Em, but I know she was watching. Just eating her chili made it feel like she was close. And this is good chili. It's just spicy enough and full of goodness with lots of beans and delicious spices and flavor. I'm writing the recipe as we make it, which means that we don't dice the onion or green bell pepper and we don't sauté it with the ground beef. My dad hates onion and green pepper, but the flavor is necessary, so the onion goes in whole and the pepper is quartered. This is how I've always eaten it, so this is how I chose to make it. And it didn't disappoint. Comfort food in a bowl!

Nana's Chili
*From Naomi
1 pound ground beef
1 large onion
1 green bell pepper
2 tablespoons brown sugar
1/2 teaspoon onion powder
1/2 teaspoon garlic powder
1/2 teaspoon pepper
3/4 teaspoon salt
1 1/2 teaspoon basil
1 1/2 teaspoon oregano
2 teaspoons chili powder
1 teaspoon red pepper flake
1 can stewed tomatoes
2 cans tomato sauce
2-4 cans dark red kidney beans, drained and rinsed (I use 4 because the beans are my favorite part!)
1 large can tomato juice
Brown the ground beef and season with garlic powder and onion powder. Drain the fat and add two tablespoons brown sugar. Stir.
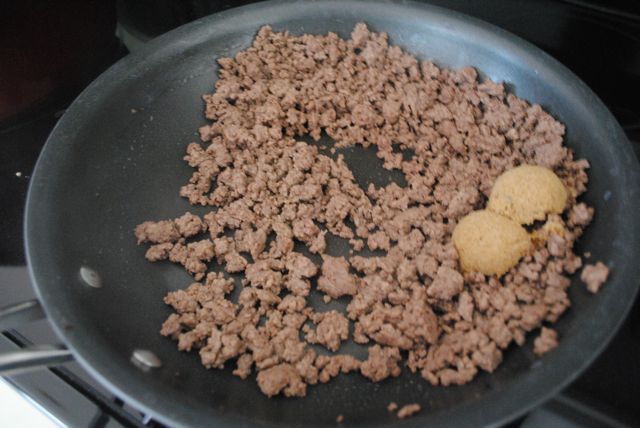
Add the ground beef and then the other ingredients, except the onion and green pepper, to a large pot and stir.

Quarter the green bell pepper and remove the ribs and seeds. Peel the onion and add the whole onion and pieces of pepper to the chili and stir.

Cook on low heat for 3-5 hours (or all day in a slow cooker), stirring occasionally. Remove the onion and bell pepper before serving. Enjoy!
Thursday, October 6, 2011
Creamy Chicken, Black Bean, and Corn Taco Filling

This filling is incredibly easy, as it cooks in the crock pot for 4-5 hours. I love the versatility of it too, as you could use it in traditional tacos or enchiladas or you could make taquitos out of it, which is what I did. Either way, this was a flavorful and slightly spicy delicious way to enjoy some Mexican food.

Creamy Chicken, Black Bean, and Corn Taco Filling
3-5 chicken breasts, frozen
1 can black beans, rinsed and drained
2 cups frozen corn
1 15-ounce jar salsa (I blend mine to remove the chunks)
1 8-ounce block of cream cheese, softened
Taco seasoning, cumin, onion powder, and garlic powder, to taste
Squeeze of lime juice
Place your chicken in a greased crock pot and season with taco seasoning, cumin, onion powder, and garlic powder.

Add the frozen corn.

Add the black beans.

Pour on your salsa (or Ro-Tel if that's what you have on hand)

Cook on high for 4-5 hours or until the chicken is cooked through. Remove the chicken and shred with two forks, then stir the chicken back into the taco mixture. Add cream cheese.

Cover and let it sit for a 1/2 hour. Stir to completely combine the cream cheese and add a squeeze of lime juice.

Now your filling is done! Enjoy on tacos, enchiladas, or a salad. Or you can use the filling for taquitos. Here's what we did: (Adapted from my baked chicken taquitos)
Preheat oven to 425º. Line a baking sheet with foil and spray with cooking spray. Place about 1/4 cup of filling in warmed corn tortilla shells. Top with monterey jack cheese and fresh cilantro.

Roll your taquitos and place seam side down on the prepared baking sheet. Spray liberally with cooking spray and sprinkle with kosher salt.

Bake for 15-20 minutes or until ends start to crisp and brown. Enjoy!
Subscribe to:
Posts (Atom)