Sunday, September 18, 2011

Cinnamon Chip Oatmeal Cookies

I have an obsession with all things cinnamon. There, I said it. Cinnamon is good on everything and in liberal amounts. This is not some crazy pregnant lady thing, this is a fact. What is a crazy pregnant lady thing is that I have been having dreams about good oatmeal cookies for a few weeks now. I needed them. The baby needed them! That definitely sounds crazy (and like I'm trying to justify the 2 cookies I had after my cereal this morning), but when I've eaten these cookies, she gets very active and kicks the poo out of my rib cage. I think she's a fan too.

About the cookies: oh yum. Oh heaven. Oh deliciousness! Where have you been all my life? Soft, chewy, full of cinnamon, and amazing. This was an easy, simple recipe, and the addition of cinnamon chips (JOY!) takes them over the top. Hubby's co-worker stole the bag I sent to work with him. Good thing, or I'd be eating my body weight in cinnamon chip oatmeal cookies today. There is no moderation in the land of nine months pregnant!

Cinnamon Chip Oatmeal Cookies
*Adapted from Tasty Kitchen

2 sticks unsalted butter, softened
1 cup firmly packed brown sugar
1/2 cup white sugar
2 eggs
2 teaspoons vanilla extract
1 1/2 cups flour
1 teaspoon baking soda
1 teaspoon cinnamon
1/2 teaspoon salt
3 cups quick oats
1 cup cinnamon chips

Heat oven to 350º. Beat together butter and both sugars until creamy.

Add eggs and vanilla and beat well. In a separate bowl, whisk together flour, baking soda, cinnamon, and salt. Add to the batter and mix until just combined.

With a spoon, stir in the oats.

Add cinnamon chips and stir to combine.

*Side note: Cinnamon chips taste like the filling of a cinnamon roll. Heaven.

Drop rounded teaspoons of batter onto a Silpat or ungreased cookie sheet. Bake for 9-11 minutes until golden. While waiting between batches, it's helpful to pop the batter into the fridge to keep it chilled. Cool about 1 minute on the cookie sheet before transferring to the cooling racks.

Enjoy!

Saturday, September 17, 2011

Aunt Kathy's Chicken Tetrazzini


Update (Jan 2017): We have been making this for a long time and have changed it up to reflect our tastes. I've found that adding a whole lot of garlic makes this the best dish ever. Some add mushrooms and peas, which could certainly be delicious, but I like serving it with a simple salad and calling it good. We also only make it using penne, as it holds the sauce a lot better than spaghetti.

Now that I am nearing the end of my pregnancy (37 weeks on Monday!), my complete aversion to all things chicken has subsided somewhat. I'm not saying that if you put a medium rare filet mignon and a piece of chicken in front of me, I'm not going to choose the succulent piece of beef, but at least the thought of chicken doesn't make me gag anymore.

This recipe definitely doesn't make me gag. In fact, I ate most of the leftovers, which says a lot in this house! My mom started making this only a few years ago and I've always loved it, so when I got the recipe from her a few weeks ago, I couldn't wait to make it. It came from my amazing Aunt Kathy, so you know it's good. It's also very simple. The recipe requires a few pans, so you will make a bit of a mess (or, if you're like me, a huge mess), but it is so worth it. This makes a lot, so you can easily feed a crowd or freeze the leftovers. That was my plan, you know getting ready for baby and all, but I ended up eating the leftovers. Oh well. It was worth it!

Aunt Kathy's Chicken Tetrazzini
*Adapted from my Aunt Kathy's recipe

1 pound penne (or pasta of your choice)
1/2 cup butter (1 stick)
6 cloves garlic, minced
3/4 cup flour
2 cups hot milk
2 cups hot chicken broth
1/2 heaping teaspoon salt
1/2 heaping teaspoon pepper
1/4 teaspoon nutmeg
1/2 cup sherry
1 cup heavy cream
1/2 pound mushrooms, sliced
2-3 cups diced cooked chicken (3 breasts)
1/2-2/3 cup parmesan or Romano cheese, grated
2/3 cup Italian breadcrumbs

Preheat oven to 400º. Cook pasta until just before al dente. Add milk and chicken broth to a large microwave-safe bowl or glass measuring cup and microwave until warm. Meanwhile, melt 1/2 cup butter in a large saucepan over medium heat. Add garlic and sauté for a minute. Whisk in flour. Cook for a minute or two and then stir in hot milk and chicken broth. Cook and stir until thick. Add more milk or broth if the mixture becomes too thick. 

Whisk in salt, pepper, nutmeg, sherry, and heavy cream (or milk, if you want to lighten it up a little bit) and remove from heat. One delicious thing we've started to do here is to add about 1/3 cup or more of parmesan to the sauce. Completely optional, but very yummy.


Mix the sauce, noodles, and chicken together. 

Pour into a large greased baking dish. 

 Mix the parmesan or Romano cheese and breadcrumbs and sprinkle on top of the pasta. 

Bake for 30-45 minutes or until bubbly and enjoy!

Thursday, September 8, 2011

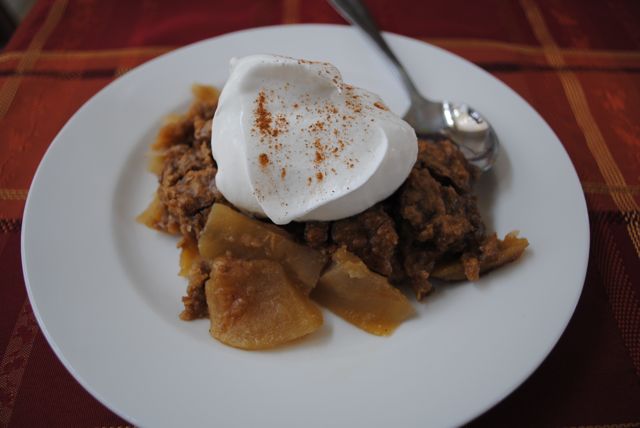
Mom's Apple Crisp


Well, Hubby and I have officially begun the countdown. Baby girl is due in about 4 weeks and we're hoping (praying, begging) that she is a little early because the end of this pregnancy has been far more difficult than the beginning. Of course, the sweltering heat this week doesn't make the swollen ankles and discomfort any better, but the end is in sight. I just have to keep telling myself that!

I made this recipe a long time ago and the photos have been sitting on my computer waiting to be put into a post. I confess that I haven't been all that inspired to write or do much of anything lately, but I have to share this one before fall is really upon us because this apple crisp begs to be made in the cool weather I know is just around the corner. This recipe is my mom's, but it's also in one of my Nana's old cookbooks, which is probably where Mom got it in the first place. Regardless, Mom's apple crisp is guaranteed to make you happy and make your house smell like heaven. It's very, very easy too and always a crowd pleaser. So, once you feel that bite in the air that signals fall, make this apple crisp! Your friends and family will thank you, I promise!

Mom's Apple Crisp
*From my mom

6 cups peeled, pared, and sliced apples (8-10 apples-use Golden Delicious, Granny Smith, or Cameos; we use all Granny Smith because I love the flavor contrast between tart and sweet)
1 1/2 cups brown sugar, packed
1 cup flour
1 cup oats
1 1/2 teaspoons cinnamon
1 1/2 teaspoons nutmeg
2/3 cup margarine or butter, softened

 Heat oven to 375º. Grease 9x13 pan. Place apples slices in the pan. 


Mix remaining ingredients thoroughly and sprinkle over the apples.


Bake 30-45 minutes or until apples are tender and topping is golden brown. 


Serve with whipped cream or ice cream and cinnamon. Enjoy!

Saturday, July 16, 2011

Lapin Rôti (Roasted Rabbit)

While Hubby and I were in France last year, we got a chance to try a lot of different kinds of food, from horse to escargot to fresh chevre to fois gras. One of the meals that stood out the most to us (and the one we thought we had the most success of recreating) was my dish of roasted rabbit at Le Florentin in Bayeux, Normandy. This was our dinner after spending the day at the D-Day beaches and we were emotionally and physically drained. And starving. My beautiful rabbit thigh came out perfectly roasted, moist, and delicious. We decided we had to try making this dish at home.

And today, we finally did it! We picked up a rabbit at our local butcher shop, which came whole without the head and feet. Hubby found a video online that showed how to butcher it (see link further down) and we browned, then roasted the delectable little morsel. And it was SO good! This is a simple recipe with simple flavors, and it really allows the flavor of the rabbit to shine. If you're wondering what rabbit tastes like, well try the recipe!

(If you're still wondering, it's a cross between the dark meat of chicken and turkey. It's incredibly lean, which means it's good for you too!)


Lapin Rôti (Roasted Rabbit)
*Adapted from Cooks Recipes

3-4 tablespoons olive oil
1 rabbit (look for a young rabbit, between 1 1/2-3 pounds)
1 onion, diced
1 clove garlic, crushed
1 cup white wine
1 teaspoon rosemary
2 tablespoons chopped parsley (we didn't use any)
Salt and pepper


First, butcher your rabbit. Here's a helpful video: How to Cut Up a Rabbit.

Add cut pieces to a bowl of salt water.


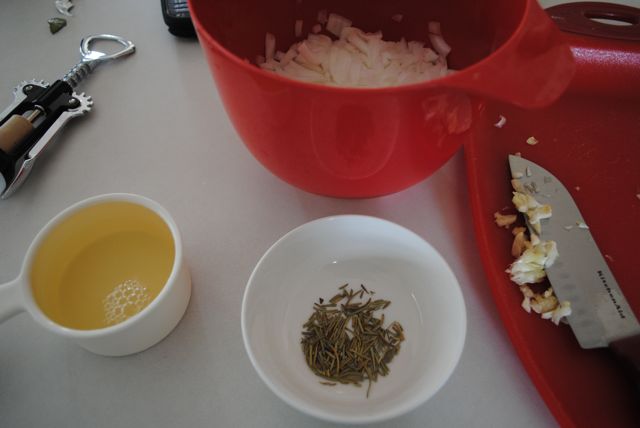
Heat oven to 350º. In a large, heavy skillet heat olive oil over medium heat until shimmering. Pat dry rabbit and season with salt and pepper. Add to skillet and brown on both sides for 4-5 minutes or until golden. Prepare your other ingredients and have them ready to go (mis en place).


Place rabbit in a shallow baking dish. Add your chopped onion to the remaining oil in the skillet and stir. Cook on low heat for 10 minutes, stirring constantly, or until onions have softened. (Ugh, check out the oil mess on my stove. Splatter screen Stephanie! Go put it on your grocery list! Geez.) 


Add crushed garlic and stir. Cook for another 2 minutes. Add wine and rosemary, stirring well. 

Pour the sauce over the rabbit and season again with salt and pepper.
 

Bake for 45 minutes. Serve sprinkled with chopped parsley and enjoy!

Monday, June 13, 2011

Slow Cooker Root Beer Pulled Pork


We have big news: We are having a little girl! Hubby is terrified and we're both excited. We have a couple of names picked out, but we won't be naming her until she is here. Now we're just preparing the nursery and making lists of all the baby stuff we need to buy-and there is a lot of it!

On to the recipe! I'm no longer meat-averse, but I am HATING all things chicken. Give me a steak or a roast any day, and I even ate a cheeseburger! I haven't had a cheeseburger in many, many years. This recipe, while not beef, was absolutely delicious. And it couldn't be easier. We started with a thawed roast, but next time I'll use a frozen one and cook it for longer. I really believe that low and slow theory is right on.

Slow Cooker Root Beer Pulled Pork

2+ pound pork roast (you can use tenderloin, butt, shoulder, etc.)
1 can or bottle of root beer (we used A&W, but you could also use Dr. Pepper or another brand)
1/2 teaspoon onion powder (or half an onion, thinly sliced)
1/2 teaspoon garlic powder (or 2 cloves garlic, finely minced)
Freshly cracked pepper, to taste
1 bottle of your favorite BBQ sauce

Place your roast, frozen or thawed, into your slow cooker. Rub onion powder, garlic powder, and pepper into the roast.


Pour your root beer all over the roast.


Cook on low 5-6 hours, or until the meat shreds easily with a fork. Remove the roast to shred it and pour the root beer mixture into a separate bowl. Return the dry shredded pork to the slow cooker.


Pour on your BBQ sauce and mix. We used a Memphis style, because that's what we had on hand, but we prefer Carolina style (more vinegary), so we added a little apple cider vinegar.


Test your pulled pork and add a little bit of the root beer mixture to taste. This will sweeten it up and thin it out a little bit. Serve it up on toasted hamburger buns with corn on the cob and enjoy!

Monday, May 9, 2011

Roasted Chicken


I am still experiencing a meat aversion, which, according to my doctor, is normal for pregnant women. I just hit 18 weeks and we find out the baby's gender on May 18th. Add that to my ever-growing stomach, and this whole thing is becoming more real by the day! Hubby and I keep asking each other what we got ourselves into, but we're very excited (along with terrified).

Anyway, back to the food. I have been feeling so guilty about only cooking vegetarian meals for Hubby and me, so today I decided to roast a whole chicken. My first one. Probably best to go for something a little less daunting when trying to get back into cooking, but hey, go big or go home, right? And I'm glad I chose this particular venture because the results were absolutely delicious! I have often gotten a whole roasted chicken from Fred Meyer or Costco and been pleased, but it is SO much better when you do it yourself at home. Not only does it taste better, but it also makes your house smell like heaven.

Now, with my meat aversion, Hubby ended up doing most of the prep work, but I supervised. When asked if he thought the extra work was worth it, he couldn't say because his mouth was full of chicken. He picked at the carcass for quite a while too, so I know it was good. This is a basic roasted chicken recipe, but it can certainly be jazzed up with additional herbs, onions, potatoes, lemons, etc. We liked the simplicity of it and the way the flavor of the chicken wasn't masked by seasonings, but to each his own, right?

Roasted Chicken
*From me!

1 whole chicken, about 4-6 pounds
Olive oil
Kosher salt
Pepper

Preheat the oven to 425º. Remove the chicken from the bag and pull out the giblets. Use tongs if the thought of sticking your hand up a chicken's rear isn't appealing to you. Rinse the chicken completely, inside and out. Pat dry with paper towels. Drying the bird will ensure that the skin is crispy.

Sprinkle on a generous amount of kosher salt.

Add freshly ground pepper to taste. This means LOTS for us!

Drizzle on a little bit of olive oil.

Beg your hubby to rub it in for you if you're pregnant and feeling nauseous when you think about touching the raw chicken. Or do it yourself if you're superwoman. (I am not, FYI).

Add more pepper, if so inclined. Or other herbs. This is also the point at which you might want to stuff a lemon up the chicken or add cut up onions or potatoes to the pan. Up to you. However you're going to do it, the chicken bakes for 85-90 minutes, depending on weight. Check the temperature of the bird with a meat thermometer when you think it's done, making sure to insert it away from any bones to get a true reading. You should also cut one of the legs to make sure the juices are running clear.

Once the chicken is done, carve and enjoy! We had ours with kale chips and sweet potato casserole.

It was delicious! Hubby has fallen in love with me all over again. He even called himself a meat whore. I didn't comment on the inappropriateness of the statement, but smiled indulgently and asked if he'd like more chicken. He screamed yes.

Kale Chips


There are so many recipes out there that I want to try (eventually . . . ), but this one has been floating around the blogosphere for a while and I've been so curious about it. So today I decided to try making kale chips. And oh my goodness, am I glad I did! These were delicious! They were crispy, salty, peppery, and yummy. I liked the chips more than Hubby, but I think this had something to do with him being tired of all things non-meat. According to the mommy blogs out there, children enjoy these chips as well. Score one for the mommies! Plus, the health benefits of kale are phenomenal, so why not try it and see how the little ones like it?

As a side note, these are best right out of the oven. Don't reheat them or they get chewy and make sure you spread the chips out in a single row on the baking sheet so they can get crispy.

Kale Chips
*From many blogs!

1 bunch kale
Olive oil
Salt
Pepper (or just use salt if you don't want that peppery kick)

Preheat oven to 350º. Hold the thick stem of the kale in one hand and, with the other hand, pinch the stem and run your hand up to remove the leaves. Place leaves in a single layer on a parchment lined baking sheet.

Pat the kale dry with a paper towel, if necessary. Drizzle on a little bit of olive oil.

Add salt.

Then pepper, if desired.

Toss with clean hands.

Bake for 12-16 minutes, or until the kale is crispy. Enjoy!